Post by Sabertooth on Jul 5, 2019 11:41:56 GMT -5
It's not as impossible as everyone would lead you to believe.
Preface:
What does changing it do? Well, in short, it allows the engine to breath at higher RPM.
The science:
An intake manifold consists of two parts. The runner, and the plenum. The runners carry air from the plenum to the intake valves, feeding the engine. The plenum connects to the throttle body, which controls the flow of atmospheric pressure air in. When the engine has the intake valves open and pistons dropping, there is a volume of space created that the air will then fill. Being a gas, the air will drop in pressure so that it can increase in volume to fill all available space. This accelerates the air into the cylinders, and feeds it the air it needs to burn the fuel. When the intake valve closes, the inertia of the moving air molecules isn't lost. The air hits the closed valve, and bounces back as a pressure wave. Optimally, we want to catch that pressure wave by opening the intake valves before it reaches the plenum and spread out. By doing this, we pull in the higher pressure air, which can allow for volumetric efficiencies to rise over even 100% the normal atmospheric volume of the cylinder. Long runners sound great, right? They trap that pressure wave! Well, kind of.
We must also be sure that the runner length is not so long that the airspeed as it travels through reaches the critical point of the sound barrier. The speed of sound in a particular medium is limited by how quickly the molecules can transfer energy to the next. This has much to do with density. As we know, density of the air drops when the intake valve opens and the vacuum is formed, and the longer it takes the air to flow from the plenum to the cylinder, the lower the pressure becomes, and the lower the sound barrier becomes, so the maximum flow rate drops. When this point is hit, the engine can't breath any more air, and will very rapidly drop in power when viewed on a dyno chart.
So now we know, it's a balance of catching the pressure wave, and also maintaining airspeed into the engine. So what's the right answer? Well, you need to look at the RPM the engine is going to make its power at. By using short runners, at low RPM that energy wave will escape. But at high RPM when the intake valve is opening and closing rapidly, it can begin to catch it!
The 4G63 manifold has significantly shorter runners than the 4G69 manifold. This allows it to make peak torque at a much higher RPM. As horsepower = torque*RPM/5252, that shows that if you make torque up high instead of down low, the overall energy output rises. It will definitely hurt bottom end power, and I don't suggest this unless you have a reason. Maybe it might do something for a full bolt on manual, but I don't have any data to suggest it. I plan to rev to 8500 on a built motor, so that's why I did this.
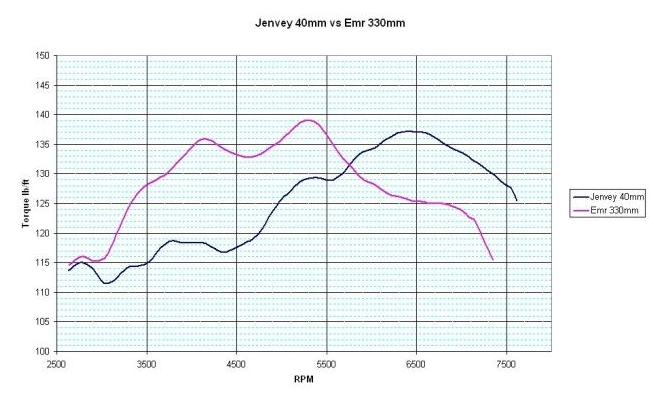
Here's a nice dyno chart example on a Honda engine. They used 40mm runners, and 330mm runners. As you can see, longer runners definitely add punch down low
![]()
How to:
At a glance, you'll find that the 4G63 and 4G69 manifolds are very similar. They both have a coolant passage, both have an EGR passage, and they both have 4 runners.
They connect to the likewise ports on the head of the engine, as shown here on this 4G69
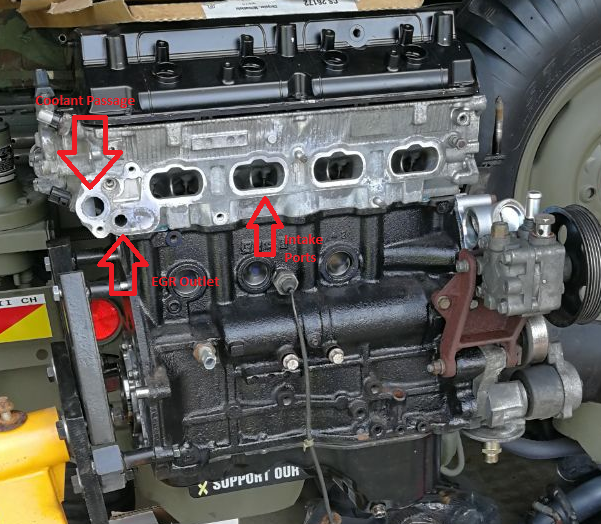
The problem lies in that the EGR and coolant passages for the 4G63 manifold are slightly offset different, and the lower bolt holes are different.
First solution: The coolant passage.
To fix this, what you're going to do is cut off the coolant passage "ear" from both the 4G63 manifold, and the 4G69 manifold. You'll be using the 4G69's coolant passage "ear" as a spacer between the head and the thermostat housing to maintain proper geometry between the water pump, coolant hose, and thermostat housing. This is important as you don't want coolant leaks!
Second problem: The EGR
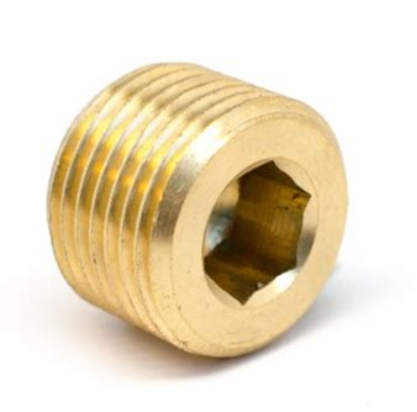
To solve this one, you're going tot ake a 9/16" drill bit and run that into the EGR port in the engine head. Do this with the exhaust manifold removed, and use compressed air to blow the filings out the other side. Filings left inside are likely to cause damage to either the motor itself, or a downstream turbo or cat if applicable. You'll then run a 3/8" NPT tap into the hole, and plug it with a 3/8 NPT brass or if you can find one, aluminum fitting. It doesn't NEED to be a flush fit, but optimally you'll want to get as much thread in as possible. Something countersunk you can screw in would be optimal, such as this fitting here
For the lower bolt holes, you're going to take a piece of steel plate/bar, and drill holes in to to match up with the intake manifold, and two holes to match to the 4G69 head's mounting studs.
For a gasket, you're going to need to use a 4G69 AND a 4G63 intake manifold gasket. Have I lost my mind? Yes but that's irrelevant right now. The reason is that the 4G63 manifold has slightly higher injector ports than the 4G69 manifold does, so the 69 gasket will never fully seal up there, plus it covers the spray pattern of the injectors. So you'll have an impossible to fix vacuum leak, and poor combustion as your fuel literally drips down the manifold.
The '69 gasket will have to have the coolant passage section cut off of it to sit between the head and the thermostat housing spacer. Use RTV on the side between the spacer and the thermostat housing (as per the factory service guide)
You will have to cut the intake manifold runner section off of the '69 gasket, and cut the EGR/coolant passage section off the '63 gasket. Be careful, and I found tin snips to work well. Do not bend the gaskets, do not have any section overlap or you may have a vacuum leak, or coolant leak.
Here is the '69 gasket over top of the '63 gasket. The difference is slight, but it's important. Do not install it as I have shown here, this is only a reference picture to show the differences!
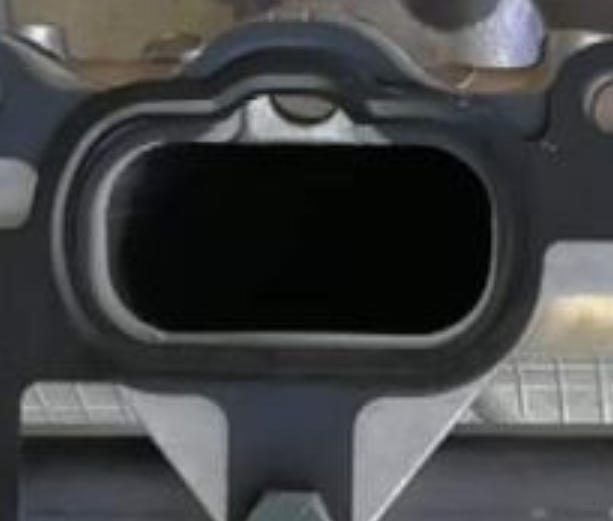
All said and done, you should have a product that looks something like this, ready to be bolted on.
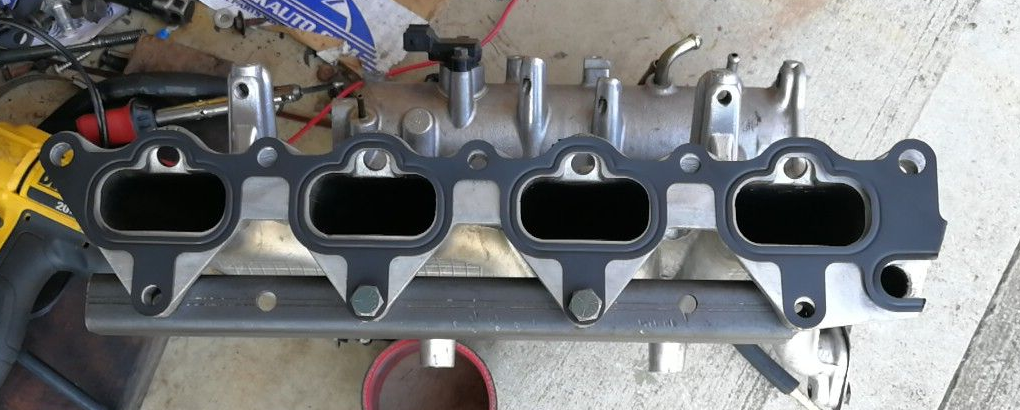
Put the manifold on, then the spacer in. A dab of RTV helps hold the gasket to the spacer, and makes for a much easier install.
For the EVAP purge solenoid, you will have to extend the wiring if you wish to use the 4G63 manifold's lines and mounting point. Doing so makes for a cleaner install. The brake booster line will also need to be extended. The MAP sensor will sit fine. Be sure to use the 4G69 sensor if you're NA as the evo sensor is a 3 bar. The fuel rail inlet may need to be bent away from the throttle body to clear (one I had did, one came pre-bent)
Installed, it should look like this
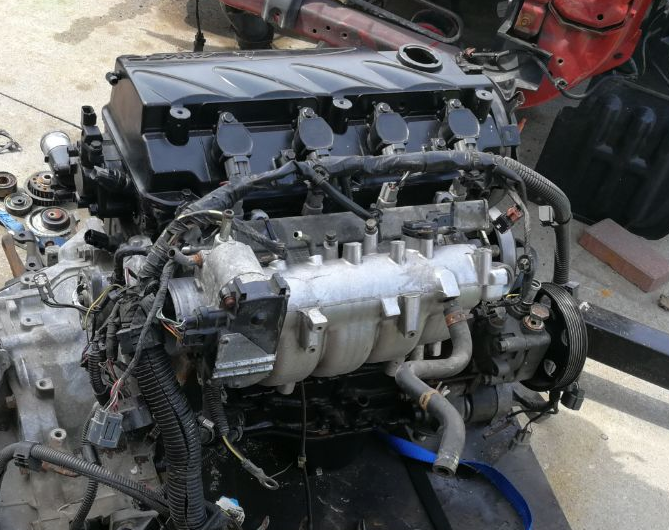
You'll find that the '63 manifold sits about 4" lower than the '69 manifold, so your stock intake will NOT line up. But if you're this far, using a couple of silicone couplers and cutting your intake piping up shouldn't really be asking much. I used a pair of 45s and the 45 degree bend from the top of my DC sports cold air intake (as part of my charge piping), and it lined up will enough that I could still connect to my intercooler.
For the fuel rail, the '69 rail will NOT bolt on with your stock size injectors. You'll need to modify a '63 fuel rail to your use, modify the '69 rail, or convert to full return fueling with a 58psi fuel pressure regulator. I cut the feet off the '69 rail for now, zip tied it on, and pressure tested. I have no leaks, but still wouldn't recommend this method, as done wrong it is a fire hazard.
As for injector spray, you'll find that by having covered up half the spray pattern, the car will run, but at low airflow, like at idle, it will want to stall. The fix is to either open up the head a bit, or use longer injector nozzles at the end that spray directly into the head itself and not into the intake manifold runner. I highly suggest doing one or the other, if not both, for the smoothest airflow across your spray pattern.
So there you have it, the first 4G63 manifold conversion I'm aware of ever done to a 4G eclipse. It's an afternoon job, and if you're at a point where this is something you actually need, then it shouldn't be hard for you.
Preface:
What does changing it do? Well, in short, it allows the engine to breath at higher RPM.
The science:
An intake manifold consists of two parts. The runner, and the plenum. The runners carry air from the plenum to the intake valves, feeding the engine. The plenum connects to the throttle body, which controls the flow of atmospheric pressure air in. When the engine has the intake valves open and pistons dropping, there is a volume of space created that the air will then fill. Being a gas, the air will drop in pressure so that it can increase in volume to fill all available space. This accelerates the air into the cylinders, and feeds it the air it needs to burn the fuel. When the intake valve closes, the inertia of the moving air molecules isn't lost. The air hits the closed valve, and bounces back as a pressure wave. Optimally, we want to catch that pressure wave by opening the intake valves before it reaches the plenum and spread out. By doing this, we pull in the higher pressure air, which can allow for volumetric efficiencies to rise over even 100% the normal atmospheric volume of the cylinder. Long runners sound great, right? They trap that pressure wave! Well, kind of.
We must also be sure that the runner length is not so long that the airspeed as it travels through reaches the critical point of the sound barrier. The speed of sound in a particular medium is limited by how quickly the molecules can transfer energy to the next. This has much to do with density. As we know, density of the air drops when the intake valve opens and the vacuum is formed, and the longer it takes the air to flow from the plenum to the cylinder, the lower the pressure becomes, and the lower the sound barrier becomes, so the maximum flow rate drops. When this point is hit, the engine can't breath any more air, and will very rapidly drop in power when viewed on a dyno chart.
So now we know, it's a balance of catching the pressure wave, and also maintaining airspeed into the engine. So what's the right answer? Well, you need to look at the RPM the engine is going to make its power at. By using short runners, at low RPM that energy wave will escape. But at high RPM when the intake valve is opening and closing rapidly, it can begin to catch it!
The 4G63 manifold has significantly shorter runners than the 4G69 manifold. This allows it to make peak torque at a much higher RPM. As horsepower = torque*RPM/5252, that shows that if you make torque up high instead of down low, the overall energy output rises. It will definitely hurt bottom end power, and I don't suggest this unless you have a reason. Maybe it might do something for a full bolt on manual, but I don't have any data to suggest it. I plan to rev to 8500 on a built motor, so that's why I did this.
Here's a nice dyno chart example on a Honda engine. They used 40mm runners, and 330mm runners. As you can see, longer runners definitely add punch down low

How to:
At a glance, you'll find that the 4G63 and 4G69 manifolds are very similar. They both have a coolant passage, both have an EGR passage, and they both have 4 runners.
They connect to the likewise ports on the head of the engine, as shown here on this 4G69

The problem lies in that the EGR and coolant passages for the 4G63 manifold are slightly offset different, and the lower bolt holes are different.
First solution: The coolant passage.
To fix this, what you're going to do is cut off the coolant passage "ear" from both the 4G63 manifold, and the 4G69 manifold. You'll be using the 4G69's coolant passage "ear" as a spacer between the head and the thermostat housing to maintain proper geometry between the water pump, coolant hose, and thermostat housing. This is important as you don't want coolant leaks!
Second problem: The EGR
To solve this one, you're going tot ake a 9/16" drill bit and run that into the EGR port in the engine head. Do this with the exhaust manifold removed, and use compressed air to blow the filings out the other side. Filings left inside are likely to cause damage to either the motor itself, or a downstream turbo or cat if applicable. You'll then run a 3/8" NPT tap into the hole, and plug it with a 3/8 NPT brass or if you can find one, aluminum fitting. It doesn't NEED to be a flush fit, but optimally you'll want to get as much thread in as possible. Something countersunk you can screw in would be optimal, such as this fitting here

For the lower bolt holes, you're going to take a piece of steel plate/bar, and drill holes in to to match up with the intake manifold, and two holes to match to the 4G69 head's mounting studs.
For a gasket, you're going to need to use a 4G69 AND a 4G63 intake manifold gasket. Have I lost my mind? Yes but that's irrelevant right now. The reason is that the 4G63 manifold has slightly higher injector ports than the 4G69 manifold does, so the 69 gasket will never fully seal up there, plus it covers the spray pattern of the injectors. So you'll have an impossible to fix vacuum leak, and poor combustion as your fuel literally drips down the manifold.
The '69 gasket will have to have the coolant passage section cut off of it to sit between the head and the thermostat housing spacer. Use RTV on the side between the spacer and the thermostat housing (as per the factory service guide)
You will have to cut the intake manifold runner section off of the '69 gasket, and cut the EGR/coolant passage section off the '63 gasket. Be careful, and I found tin snips to work well. Do not bend the gaskets, do not have any section overlap or you may have a vacuum leak, or coolant leak.
Here is the '69 gasket over top of the '63 gasket. The difference is slight, but it's important. Do not install it as I have shown here, this is only a reference picture to show the differences!

All said and done, you should have a product that looks something like this, ready to be bolted on.

Put the manifold on, then the spacer in. A dab of RTV helps hold the gasket to the spacer, and makes for a much easier install.
For the EVAP purge solenoid, you will have to extend the wiring if you wish to use the 4G63 manifold's lines and mounting point. Doing so makes for a cleaner install. The brake booster line will also need to be extended. The MAP sensor will sit fine. Be sure to use the 4G69 sensor if you're NA as the evo sensor is a 3 bar. The fuel rail inlet may need to be bent away from the throttle body to clear (one I had did, one came pre-bent)
Installed, it should look like this

You'll find that the '63 manifold sits about 4" lower than the '69 manifold, so your stock intake will NOT line up. But if you're this far, using a couple of silicone couplers and cutting your intake piping up shouldn't really be asking much. I used a pair of 45s and the 45 degree bend from the top of my DC sports cold air intake (as part of my charge piping), and it lined up will enough that I could still connect to my intercooler.
For the fuel rail, the '69 rail will NOT bolt on with your stock size injectors. You'll need to modify a '63 fuel rail to your use, modify the '69 rail, or convert to full return fueling with a 58psi fuel pressure regulator. I cut the feet off the '69 rail for now, zip tied it on, and pressure tested. I have no leaks, but still wouldn't recommend this method, as done wrong it is a fire hazard.
As for injector spray, you'll find that by having covered up half the spray pattern, the car will run, but at low airflow, like at idle, it will want to stall. The fix is to either open up the head a bit, or use longer injector nozzles at the end that spray directly into the head itself and not into the intake manifold runner. I highly suggest doing one or the other, if not both, for the smoothest airflow across your spray pattern.
So there you have it, the first 4G63 manifold conversion I'm aware of ever done to a 4G eclipse. It's an afternoon job, and if you're at a point where this is something you actually need, then it shouldn't be hard for you.

